Apache Airflow & DAGs by Examples
Introduction
The world is undergoing a huge transformation called Digital Transformation (DX), in which previously manual workflows are being turned into automated versions. To accommodate that shift, companies have been applying automated workflow management tools, among which is Apache Airflow. This blog will give a closer look into Airflow, its core, Directed Acyclic Graphs (DAG) and the examples of the implementation of DAG to define workflows. Alright, let us begin!
What is Airflow?
Airflow is an automated workflow manager. It helps to programmatically create, run and monitor workflows regardless of how large, how complex they are, by means of representing the workflows as directed acyclic graphs (DAG/đồ thị có hướng) of tasks. Airflow was originally created as an open-source utility for supporting Airbnb’s workflows back in 2014. Airflow is designed to be dynamic, extensible, elegant and scalable.
The idea behind Airflow was “configuration-as-code”, which is to manage configuration files in repositories (in the same way as our management of source code), offering testability, maintainability and collaboration. To realize this idea, Airflow was created to employ Python language to create its task graphs in place of markup languages because of Python’s ease of importing existing supporting libraries and classes. Task graphs in Airflow can be written in just one file. Therefore, Airflow is known to be pure Python.
Ever since Airflow became open-source, there have been an increasing number of cloud service providers employing and providing their managed Airflow services. The most notable service available out there is the Google Cloud Composer, which combines the robust nature of Airflow in workflow orchestration with the already-famous distributed nature of the Google Cloud Platform and the large Google Cloud ecosystem, resulting in a user-friendly experience of managing workflows that involve several different services, for instance: Getting data from other data sources, then transferring to BigQuery, finally updating the dashboard in Google Data Studio. By a seamless integration with BigQuery combined with Airflow’s, it became apparent that the use of Airflow is beneficial in performing automated data-related workflows (for instance: data warehousing, machine learning, etc.). Also note that Airflow has no concern with data flows – it simply makes sure that the right tasks happen at the right time.
What does Airflow do?
When talking about workflows, we talk most specific about the order in which things are done. For instance, your typical “get-out-for-work” workflow is like: have breakfast → change your clothes → get out of the house → lock the door → go to work by bus. In the field of IT, workflows would mostly refer to “automated workflow” which contains a number of running tasks with a specific goal. A commonly seen example is a cron job, which is essentially an automatic task that we schedule for our personal computers to operate at a specific moment in time, like “to defragment the hard disk drive then write log to a text file at 6:00AM every Monday”. Apache Airflow bears a huge degree of similarity to those aforementioned kinds of “workflows”, the difference being that Airflow is designed to tackle much larger, much more complex automation problems than a small cron job. Companies world wide have been employing Airflow in solving such problems as:
- Automatically retrieve data from a source, transform it and generate insights in visualized form.
- Building complex machine learning models combining several other models.
- Automatically feed new data to a machine learning model then retrieve the result in a different database.
and so on. Of course, depending on our creativity, the list of what Airflow can do may be a lot more than what we have listed.
Some of Airflow concepts
- DAG or directed-acyclic graph:
- Defined as Python scripts, the DAGs represent the tasks to be carried out along with their respective dependencies.
- An example can be a DAG representing the following workflow: task A (get data from data source, prepare it for analysis) followed by task B (analyze the prepared data, yielding a visualized report), finally to task C (send the visualized report by email to the administrator); then we have a linear DAG like this: A → B → C.
- DAGs are placed in Airflow’s DAG_FOLDER. Python by default only search for DAGs in files that contains “airflow” and “dag” (case-insensitive) in the name. What also needs to be noted is that Airflow only loads DAGs that are declared globally within a file. Consider the following example by the Airflow team where the outer DAG is loaded while the inner is not:
dag_1 = DAG('this_dag_will_be_discovered') def my_function(): dag_2 = DAG('but_this_dag_will_not') my_function() - DAGs in Airflow only represent the order in which tasks are done; the details of how a task is performed is defined by defining an Operator (which will be discussed later).
- default_args: a dictionary of arguments that, when passed into the constructor of DAG, will be applied to all of its operators:
default_args = { 'start_date': datetime(2016, 1, 1), 'owner': 'airflow' } dag = DAG('my_dag', default_args=default_args) op = DummyOperator(task_id='dummy', dag=dag) print(op.owner) # Airflow - DAG run: can be thought as a specific time that the workflow with its task instances are executed. Multiple DAG runs of the same DAG can run at the same time given that their execution_date differ. For instance: a particular DAG has 2 DAG runs, one executed on 2021-03-01, another executed on 2021-03-02.
- Operator:
- An Operator defines a single task to be performed within the workflow. Without dependencies, operators can run independently as they are largely atomic, standing on their own and share nothing with others. If two operators need to share information, consider combining them into one operator.
- Examples of popular operators include: PythonOperator, BashOperator, MySqlOperator, BigQueryGetDataOperator, DockerOperator, S3FileTransformOperator, PrestoToMySqlOperator, SlackAPIOperator.
- Only operators that are assigned to DAGs are loaded. To assign an operator to a DAG, set the value of dag field on the operator or pass in the dag as argument:
# sets the DAG explicitly
explicit_op = DummyOperator(task_id='op1', dag=dag)

# deferred DAG assignment
deferred_op = DummyOperator(task_id='op2')
deferred_op.dag = dag
- Task:
- Implementation of an Operator to perform some actual work by defining specific values for the operator.
run_this = PythonOperator( task_id='print_the_context', python_callable=print_context, dag=dag, ) - Task relationships: Basic relationships of Tasks in Airflow include:
- set_upstream or <<: Task 2 << task 1 means task 2 depends on task 1.
- set_downstream or >>: Task 2 >> task 1 means task 1 depends on task 2.
- Task lifecycle: A task goes through various stages from its start to its completion. In the Airflow Web UI, the status of the tasks are as follows:


The complete task lifecycle looks like the following, with the expected route being: (1) No status, (2) Scheduled, (3) Queued, (4) Running and (5) Success.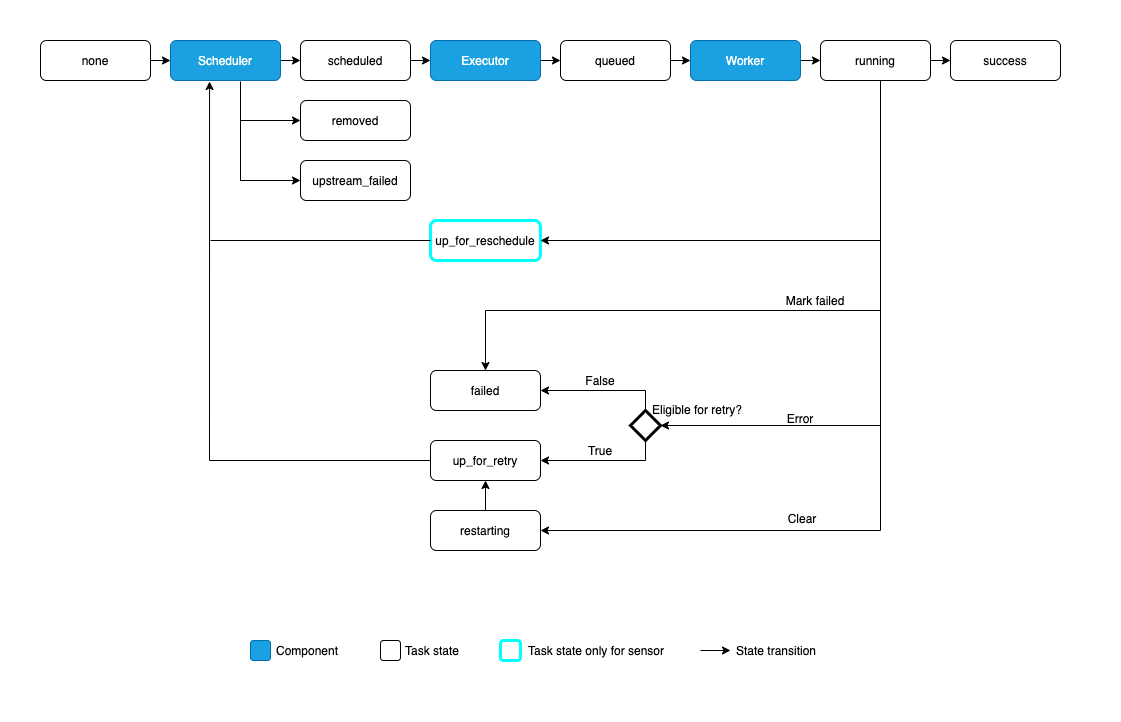
- Implementation of an Operator to perform some actual work by defining specific values for the operator.
- Sensors: Special kind of Operator that waits for external triggers before triggering their downstream operators.
- Scheduler & Executor: Scheduler is responsible of monitoring DAG folder and triggering the tasks whose dependencies have been met. When tasks are triggered, they are put in a waiting queue before getting executed using the Executor. The default SequentialExecutor of Airflow is limited as it executes everything sequentially; to ensure performance and availability, the developers of Apache recommended the CeleryExecutor (https://airflow.apache.org/docs/apache-airflow/stable/executor/celery.html#celery-executor)
How to run Airflow (local first)
Before we can do anything with Airflow (declaring tasks & workflows), we need to setup a small test environment. The page Running Airflow locally has given a very thorough guide. Please kindly follow the guide by Apache until you have started the webserver and scheduler successfully, at which moment you are presented with the following page:
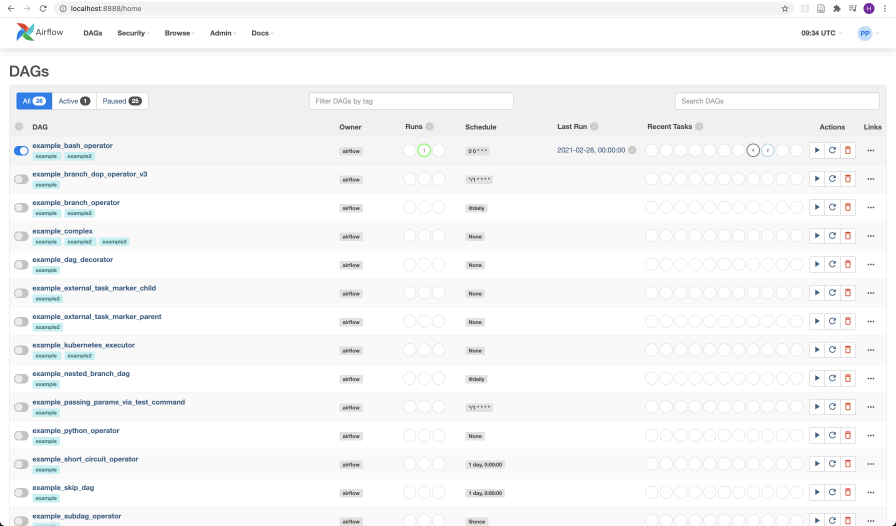
Then the workflows can be executed either by the command-line interface or by interacting with the web GUI. To start a DAG immediately, either flick the switch at the head of the DAG’s line or use the trigger DAG button in the Actions button group.
Writing an example DAG
Alright, that’s a lot of conceptual part to get started with Airflow. Now it’s time we tried to build some simple DAG. Starting version 2.0, Airflow has offered decorator-based task and DAG declaration, however since most of its documentations still contains non-decorator versions, it would be easier to start with non-decorator DAGs and tasks first. We shall start with the following workflow:

To make things easy, we will define all the trio as PythonOperators that perform nothing but execute simple print statements. In reality, users can even define custom operators that handle more complex operations, which will be briefly discussed in later sections. For even more simplicity, both workflow and operation logic are defined within the same file (in reality, they should be separated).
First of all we need Airflow’s libraries imported:
# The DAG object; we'll need this to instantiate a DAG
from airflow import DAG

# Operators; we need this to operate!
from airflow.operators.python import PythonOperator
from airflow.utils.dates import days_ago
Now we need to define the DAG first, so that inner operators can be assigned to it.
# default_args to be passed into the DAG constructor - replace with your own
default_args = {
    'owner': 'airflow',
    'depends_on_past': False,
    'email': ['airflow@example.com'],
    'email_on_failure': False,
    'email_on_retry': False,
    'retries': 1,
    'retry_delay': timedelta(minutes=5),
    # 'queue': 'bash_queue',
    # 'pool': 'backfill',
    # 'priority_weight': 10,
    # 'end_date': datetime(2016, 1, 1),
    # 'wait_for_downstream': False,
    # 'dag': dag,
    # 'sla': timedelta(hours=2),
    # 'execution_timeout': timedelta(seconds=300),
    # 'on_failure_callback': some_function,
    # 'on_success_callback': some_other_function,
    # 'on_retry_callback': another_function,
    # 'sla_miss_callback': yet_another_function,
    # 'trigger_rule': 'all_success'
}

# define the DAG
# only the first parameter (name) is required
dag = DAG(
        "pyop_example",
        default_args = default_args,
        description = "A simple example with PythonOperators"
        schedule_interval=timedelta(days=1),
        start_date=days_ago(2),
        tags=['example']
)
We will define the operators. Firstly, print_date is an operator used to print the current date/time. We first define the print_date_time function:
from datetime import datetime

def print_date_time():
  print("Now it is {}!".format(datetime.now()))
Then we define print_date task as a PythonOperator:
print_date = PythonOperator(
                  task_id="print_date",
                  python_callable=print_date_time,
                  dag=dag)
Similarly, we will define the other two operators:
# sleep function
def print_sleep():
  print("sleeping...")

sleep = PythonOperator(
                task_id="sleep",
                python_callable=print_sleep,
                dag=dag)

# templated
def print_templated():
  print("this is a template!")

templated = PythonOperator(
                task_id="templated",
                python_callable=templated,
                dag=dag)
Now we are ready to define the dependencies between the tasks. From the diagram, it can be seen that print_date triggers both sleep and templated. Therefore, using bitshift composition, we define the dependency:
print_date >> [sleep, templated]
# which is the same as
# print_date.set_downstream(sleep)
# print_date.set_downstream(templated)
The DAG file is completed. Supposed that we have created the DAG, named it “py_op_example.py” in the default folder of Airflow (~/airflow/dag). Now we can run it by executing:
python ~/airflow/dags/py_op_example.pyNow our DAG is scheduled to run by Airflow. You can check the progress using the Airflow webserver interface.
Writing a DAG performing BigQuery operator
Then we will come to more complex (yet not really hard to understand) sample workflows that were written for interaction with Google’s BigQuery. The full file can be found here. We only discuss one of the featured examples:
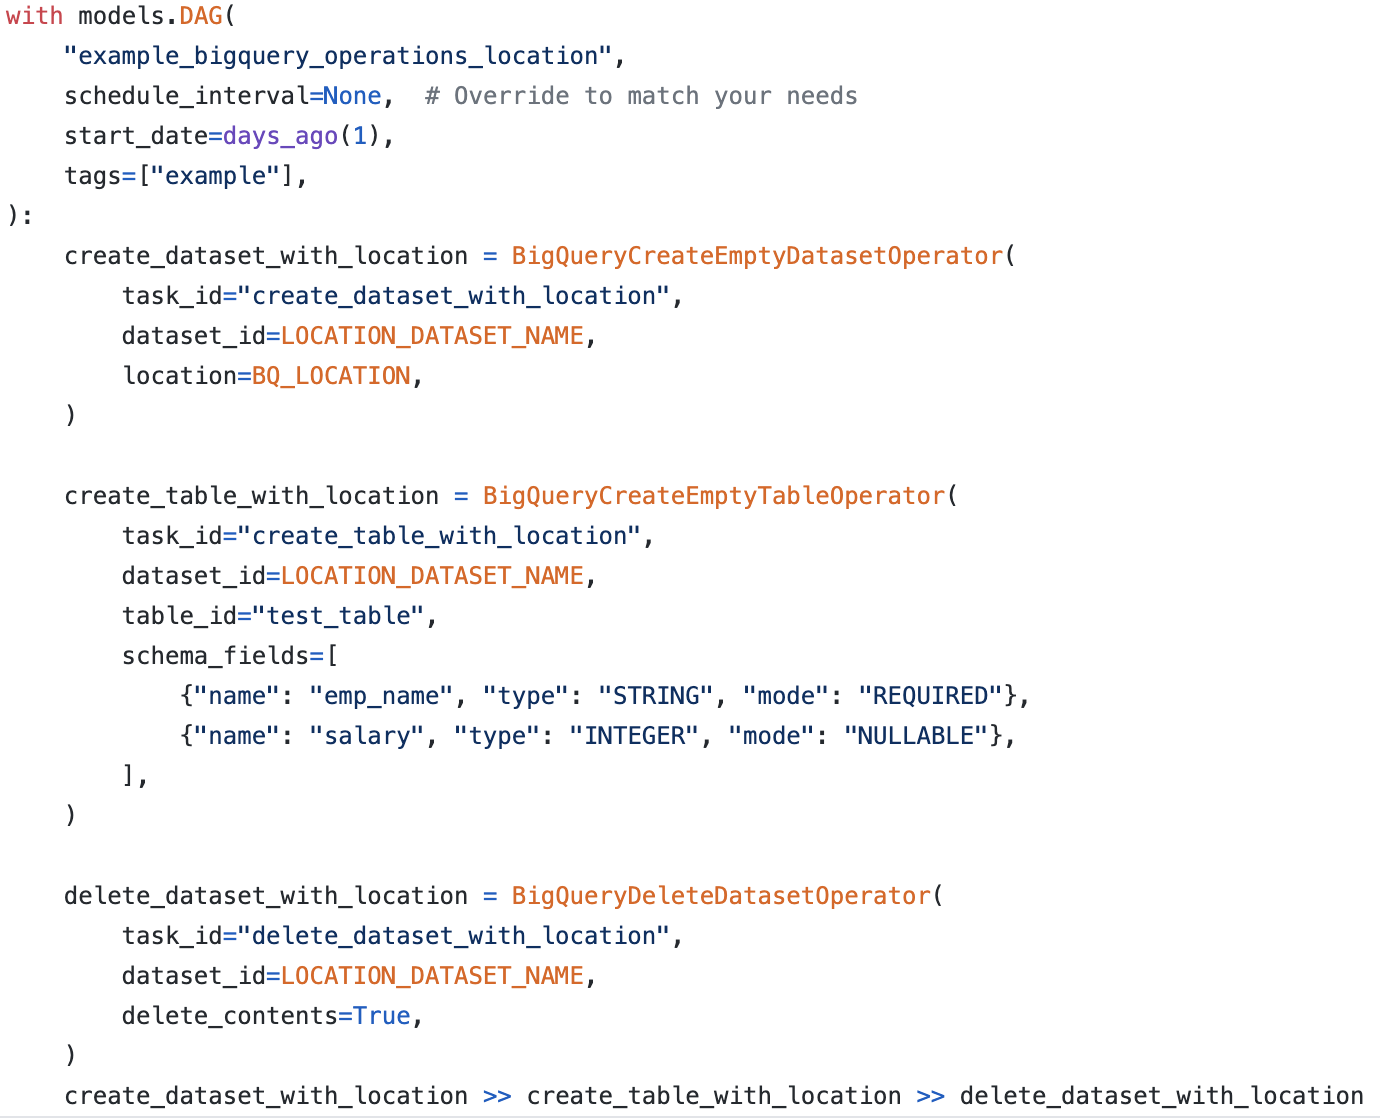
This DAG is named example_bigquery_operations_location, in which three tasks are defined: create_dataset_with_location, create_table_with_location and delete_dataset_with_location, which are implementations of BigQueryCreateEmptyDatasetOperator, BigQueryCreateEmptyTableOperator and BigQueryDeleteDatasetOperator respectively. To break down the code:
- First a location dataset is created (create_dataset_with_location)
- Then a table is created inside the just-created dataset (create_table_with_location)
- Finally, the contents of the dataset is deleted (delete_dataset_with_location)
While the above example may seem to be trivial, it has successfully demonstrate the way we can work with operators from arbitrary providers.
Writing custom operators
Sometimes, relying on just pure standard operators may not be enough for your work. Therefore, Airflow also provides a mechanism to define your own operators, simply by extending from BaseOperator class and overriding the execute method. For instance, we can move the aforementioned print_date operation logic to a separate class, like following:
from airflow.models.baseoperator import BaseOperator
from airflow.utils.decorators import apply_defaults

from datetime import datetime

def print_date_time():
  print("Now it is {}!".format(datetime.now()))

class PrintDateOperator(BaseOperator):
  @apply_defaults
  def __init__(
          self,
          name: str,
          **kwargs) -> None:
      super().__init__(**kwargs)
      self.name = name

  def execute(self, context):
      date_time = datetime.now()
      print("Now it is {}!".format(date_time))
      return date_time
Then PrintDateOperator can be imported and used like any other type of operator.
from custom_operator import PrintDateTimeOperator

with dag:
    print_date_time = PrintDateTimeOperator(task_id='sample-task', name='foo_bar')
Conclusion
In this blog, I have taken you through the most basic parts of Airflow. There is so much more about Airflow that I cannot share yet in this blog, see you in later blogs!
References

[ML – 07] Understanding Neural Network P1
[Representation] Rule – Biểu diễn tri thức dạng luật