“Vọc vạch” three.js cơ bản
Chắc hẳn không ít người trong chúng ta đã từng nghe tới three.js hoặc cho những ai mới thấy cụm từ three.js lần đầu thì nói một cách đơn giản nó là một thư viện JS giúp chúng ta vẽ 3D. Three.js giúp tạo nên các hình ảnh 3D trên browser chỉ bằng JS mà không cần phải cài thêm application nào. Ở bài viết này thay vì giới thiệu kiến thức một cách lý thuyết, chúng ta sẽ cùng tìm hiểu cách sử dụng three.js cơ bản nhất qua những ví dụ cụ thể.
Những đoạn code được lấy ví dụ có thể chạy thử mà không cần tới IDE. Chỉ cần tạo một file text copy code rồi save lại, sau đó đổi đuôi file thành .html là chúng ta có thể view được trực tiếp trên browser. Hãy chạy thử các ví dụ để trải nghiệm sự thú vị nhé!
Cùng đến với đoạn code đầu tiên, ví dụ cơ bản nhất của trang chủ threejs.org
<!doctype html>
<html class="no-js" lang="">

<head>
  <meta charset="utf-8">
  <title>Simple 3D</title>
  <script type="importmap">
  {
    "imports": {
      "three": "https://unpkg.com/three/build/three.module.js",
      "three/addons/": "https://unpkg.com/three/examples/jsm/"
    }
  }
</script>
</head>

<body>
  <script type="module">
    import * as THREE from 'three';

    const scene = new THREE.Scene();
    const camera = new THREE.PerspectiveCamera( 75, window.innerWidth / window.innerHeight, 0.1, 1000 );

    const renderer = new THREE.WebGLRenderer();
    renderer.setSize( window.innerWidth, window.innerHeight );
    document.body.appendChild( renderer.domElement );

    const geometry = new THREE.BoxGeometry( 1, 1, 1 );
    const material = new THREE.MeshBasicMaterial( { color: 0x00ff00 } );
    const cube = new THREE.Mesh( geometry, material );
    scene.add( cube );

    camera.position.z = 5;

    function animate() {
      requestAnimationFrame( animate );

      cube.rotation.x += 0.01;
      cube.rotation.y += 0.01;

      renderer.render( scene, camera );
    }

    animate();
  </script>
</body>

</html>
Mọi người đã thử chạy ví dụ rồi chứ? Ví dụ trên sử dụng three.js để dựng lên 1 hình lập phương màu lam liên tục chuyển động

Để có thể sử dụng được three.js và các thành phần hỗ trợ của nó thì ta cần nhúng three.js vào code qua đoạn mã sau
<script type="importmap">
{
  "imports": {
    "three": "https://unpkg.com/three/build/three.module.js",
    "three/addons/": "https://unpkg.com/three/examples/jsm/"
  }
}
Tiếp theo cần import three.js vào script để có thể sử dụng
<script type="module">
  import * as THREE from 'three';
</script>
Mọi người có thể thấy ở phần đầu script ta đã khai báo 3 thành phần đó là scene, camera và renderer. Đây là những thành phần quan trọng bắt buộc phải có để có thể dựng được hình ảnh 3D
- scene sẽ chứa mọi thứ trong môi trường 3D ví dụ như vật thể, ánh sáng…
- camera cách chúng ta nhìn vào scene
- renderer sẽ sử dụng input là scene và camera để tạo ra ảnh hiển thị cho chúng ta (three.js sử dụng WebGL – 1 thư viện đồ hoạ để render hình ảnh)
Sau khi có scene, camera và renderer ta sẽ tạo vật thể 3D. Vật thể 3D là một Mesh bao gồm geometry và material
- geometry giống như khung xương của vật thể
- material là phần bao ngoài khung xương tạo thành bề mặt của vật thể
const geometry = new THREE.BoxGeometry( 1, 1, 1 ); //tạo hình khối hộp
const material = new THREE.MeshBasicMaterial( { color: 0x00ff00 } ); //dùng material cơ bản lấy màu là 0x00ff00
const cube = new THREE.Mesh( geometry, material ); //tạo thành 1 vật thể 3D bằng Mesh(geometry, material)
scene.add( cube ); //thêm vật thể vào scene
function animate() {
requestAnimationFrame( animate ); //tạo chuyển động cho khối hộp
cube.rotation.x += 0.01;
cube.rotation.y += 0.01;
renderer.render( scene, camera );//render ra hình ảnh để hiển thị
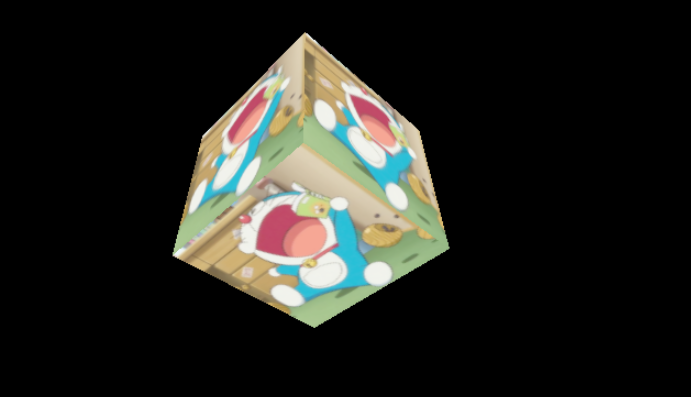
}Ngoài việc chỉ dùng màu đơn sắc, chúng ta còn có thể tạo material sử dụng hình ảnh. Hãy thử tạo khối lập phương có mặt là hình ảnh sử dụng texture loader
const geometry = new THREE.BoxGeometry(1, 1, 1);
const textureLoader = new THREE.TextureLoader(); // THREE.TextureLoader để load hình ảnh
const texture = textureLoader.load('đường_dẫn_đến_hình_ảnh.jpg');
const material = new THREE.MeshBasicMaterial({ map: texture }); // tạo material sử dụng texture
const cube = new THREE.Mesh(geometry, material);
scene.add(cube);
Và đây là kết quả
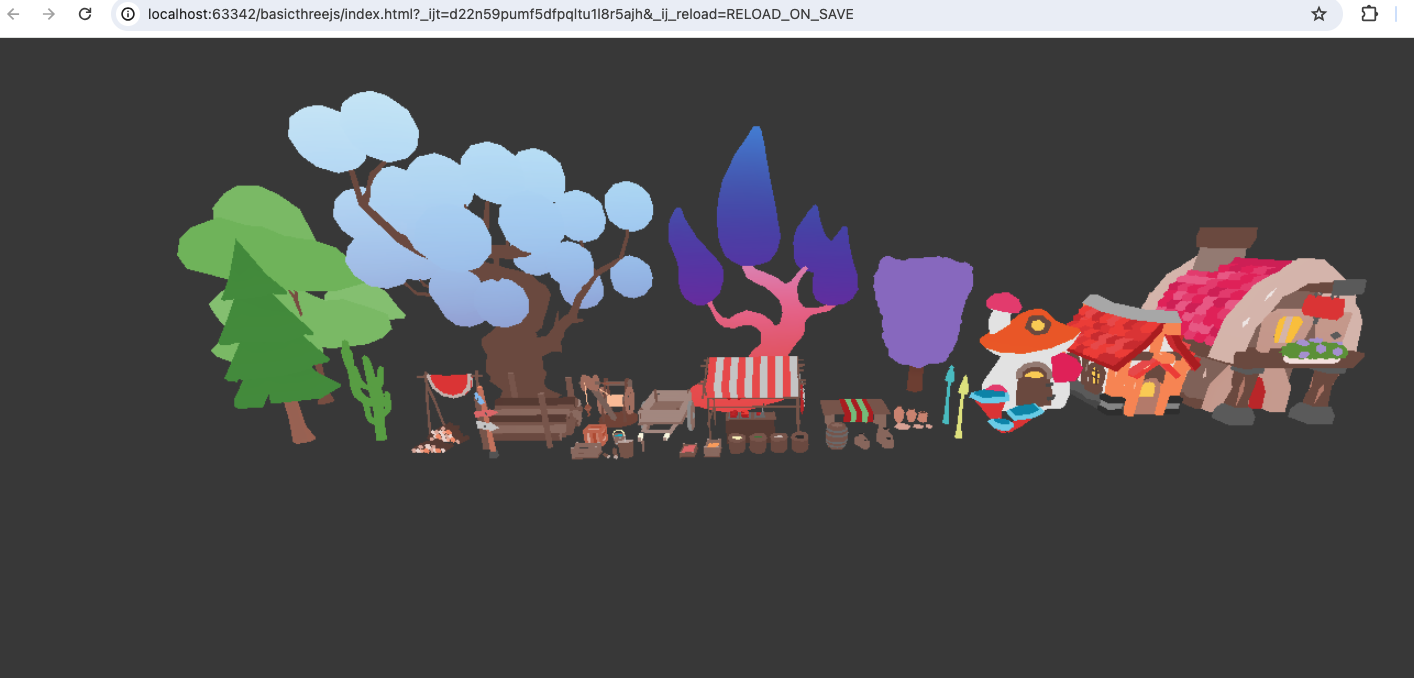
Ngoài việc dùng các hình có sẵn trong thư viện, chúng ta cũng có thể dựng các model 3D bằng ứng dụng đồ hoạ sau đó xuất ra file và dùng loader để load và hiển thị chúng bằng three.js. Có rất nhiều loader trong three.js và sau đây là ví dụ về GLTFLoader. File GLTF demo mọi người có thể lấy ở đây
<!doctype html>
<html class="no-js" lang="">

<head>
  <meta charset="utf-8">
  <title>Simple 3D</title>
  <script type="importmap">
  {
    "imports": {
      "three": "https://unpkg.com/three/build/three.module.js",
      "three/addons/": "https://unpkg.com/three/examples/jsm/"
    }
  }
</script>
</head>

<body>
<script type="module">
  import * as THREE from 'three';
  import { GLTFLoader } from 'three/addons/loaders/GLTFLoader.js';
  import {OrbitControls} from 'three/addons/controls/OrbitControls.js';

  const scene = new THREE.Scene(); // tạo scene
  scene.background = new THREE.Color(0x404040); // đổi màu background của scene
  const camera = new THREE.PerspectiveCamera(75, window.innerWidth / window.innerHeight, 0.1, 1000); // tạo camera

  // chúng ta cần thêm ánh sáng để có thể thấy được vật thể
  let lightIntensity = 3;
  let lightDist = 100;
  let lightColor = 0xFFFFFF;
  let light = new THREE.PointLight(lightColor, lightIntensity);
  light.position.set(-lightDist * 2.0, 0, lightDist);
  scene.add(light); // thêm ánh sáng vào scene

  light = new THREE.PointLight(lightColor, lightIntensity);
  light.position.set(lightDist * 2.0, lightDist * 0.25, lightDist);
  scene.add(light); // thêm ánh sáng vào scene

  light = new THREE.AmbientLight();
  light.color.setRGB(1.0 * lightIntensity, 1.0 * lightIntensity, 1.0 * lightIntensity);
  scene.add(light); // thêm ánh sáng vào scene

  const renderer = new THREE.WebGLRenderer();
  renderer.setSize(window.innerWidth, window.innerHeight);
  document.body.appendChild(renderer.domElement);

  // orbit control dùng để có thể di chuyển góc nhìn
  const controls = new OrbitControls(camera, renderer.domElement);
  camera.position.set(0, 20, 100);
  controls.update();

  // tạo một đối tượng GLTFLoader
  const loader = new GLTFLoader();

  let gltfObject;

  // tải file GLTF và hiển thị nó khi tải xong
  loader.load('đường_dẫn_tới_file_gltf', (gltf) => {
    gltfObject = gltf.scene;
    scene.add(gltfObject); // thêm vật thể vào scene

    // cài đặt vị trí của đối tượng GLTF
    gltfObject.position.set(0, 0, 0);

    animate();
  });

  camera.position.z = 3;

  function animate() {
    requestAnimationFrame(animate);

    renderer.render(scene, camera);
  }

  animate();
</script>
</body>

</html>
Mọi người đã chạy thành công code rồi chứ? Đây là kết quả của đoạn code trên với file GLTF demo
Ở ví dụ trên mọi người có thể thấy chúng ta đã phải thêm Light – ánh sáng (gồm 2 PointLight và 1 AmbientLight), nếu không có ánh sáng mọi thứ sẽ tối om và đen sì tương tự như ở ngoài đời thật. Việc này xảy ra vì các vật thể của chúng ta đã sử dụng material khác (sẽ có tính chất vật lý) chứ không còn dùng MeshBasicMaterial.
let light = new THREE.PointLight(lightColor, lightIntensity);
light = new THREE.AmbientLight();
Ví dụ cũng sử dụng thêm OrbitControls để có thể di chuyển camera, thay đổi góc nhìn quanh vật thể
const controls = new OrbitControls(camera, renderer.domElement);
camera.position.set(0, 20, 100);
controls.update();
Tổng hợp lại những từ những ví dụ ở trên, chúng ta đã thao tác với
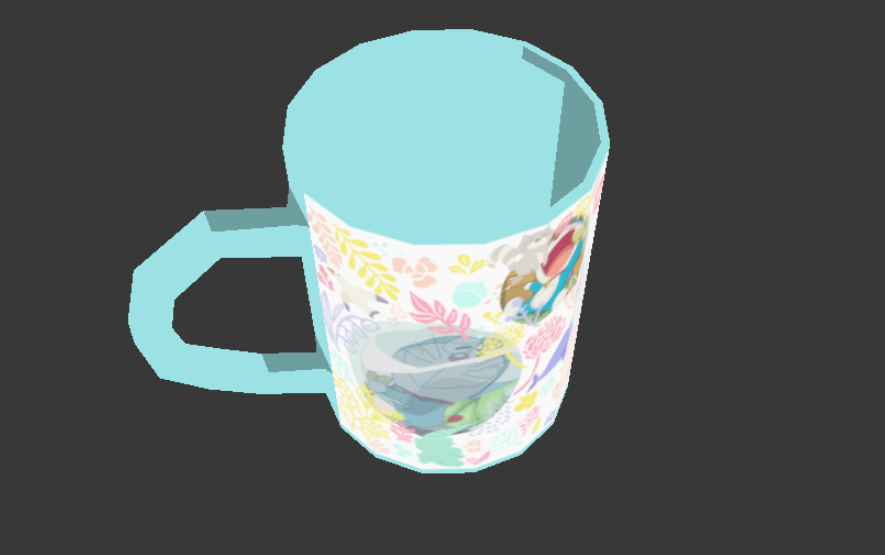
Trước đây để phục vụ dự án mình đã từng “vọc vạch” những thành phần cơ bản trên của three.js để thực hiện yêu cầu preview vật phẩm dưới dạng 3D. Để kết thúc bài blog này, mọi người hãy cùng xem thử thành quả nho nhỏ của mình nhé. File GLTF dùng trong ví dụ mọi người có thể lấy ở đây, file ảnh có thể lấy ở đây
<!doctype html>
<html class="no-js" lang="">
<head>
  <meta charset="utf-8">
  <title>3D Mug</title>
  <script type="importmap">
  {
    "imports": {
      "three": "https://unpkg.com/three/build/three.module.js",
      "three/addons/": "https://unpkg.com/three/examples/jsm/"
    }
  }
  </script>
</head>

<body>
<script type="module">
  import * as THREE from 'three';
  import {GLTFLoader} from 'three/addons/loaders/GLTFLoader.js';
  import {OrbitControls} from 'three/addons/controls/OrbitControls.js';

  const scene = new THREE.Scene(); //tạo scene
  scene.background = new THREE.Color(0x404040); //thay đổi màu background của scene

  const camera = new THREE.PerspectiveCamera(45, window.innerWidth / window.innerHeight, 0.1, 1000); //tạo camera
  camera.position.z = 10;

  //thêm ánh sáng
  let lightIntensity = 3;
  let lightDist = 100;
  let lightColor = 0xFFFFFF;
  let light = new THREE.PointLight(lightColor, lightIntensity);
  light.position.set(-lightDist * 2.0, 0, lightDist);
  scene.add(light);

  light = new THREE.PointLight(lightColor, lightIntensity);
  light.position.set(lightDist * 2.0, lightDist * 0.25, lightDist);
  scene.add(light);

  light = new THREE.AmbientLight();
  light.color.setRGB(1.0 * lightIntensity, 1.0 * lightIntensity, 1.0 * lightIntensity);
  scene.add(light);

  //tạo renderer để hiển thị scene trên trình duyệt
  const renderer = new THREE.WebGLRenderer();
  renderer.setSize(window.innerWidth, window.innerHeight);
  renderer.outputColorSpace = THREE.SRGBColorSpace;
  document.body.appendChild(renderer.domElement);

  //tạo OrbitControls để quay camera
  const controls = new OrbitControls(camera, renderer.domElement);
  camera.position.set(0, 20, 100);
  controls.update();

  const geometry = new THREE.BoxGeometry(1, 1, 1);
  const material = new THREE.MeshBasicMaterial({color: 0x00ff00});
  const cube = new THREE.Mesh(geometry, material);


  //dùng GLTFLoader để load file GLTF
  let loader = new GLTFLoader();
  loader.load('đường dẫn đến file mugUV4.gltf', function (data) {
    let textureLoader = new THREE.TextureLoader();

    //load texture
    textureLoader.load('đường dẫn đến file 1699634074503finish.png', function (texture) {
      //đặt hình ảnh bọc quanh các cạnh theo chiều ngang (wrapS) và chiều dọc (wrapT) để làm cho hình ảnh lặp lại.
      texture.wrapS = THREE.RepeatWrapping;
      texture.wrapT = THREE.RepeatWrapping;

      let material = new THREE.MeshPhongMaterial({
        shininess: 500,
        side: THREE.DoubleSide,
        map: texture //đặt texture cho vật liệu
      });

      let cdim = 3000;
      //sử dụng canvas để vẽ lại lớp texture của material
      let canvas = document.createElement('canvas');
      canvas.width = cdim;
      canvas.height = cdim;

      let compositeTexture = new THREE.CanvasTexture(canvas);
      compositeTexture.wrapS = THREE.RepeatWrapping;
      compositeTexture.wrapT = THREE.RepeatWrapping;

      //tạo lại bề mặt texture
      function rebuildTexture() {
        //tạo hình chữ nhật với màu nền tuỳ chọn (là màu của vật thể)
        let ctx = canvas.getContext('2d');
        ctx.globalCompositeOperation = 'source-over';
        let fcolor = "#65d3d7";
        ctx.fillStyle = fcolor;
        ctx.fillRect(5, 0, cdim, cdim);

        ctx.globalCompositeOperation = "source-over";

        //tính toán và chèn ảnh thiết kế lên hình chữ nhật
        let img = texture.image;
        let iwid = img.width;
        let ihite = img.height;
        let max = Math.max(iwid, ihite);
        let scl = (cdim / max) * 1;
        iwid *= scl;
        ihite *= scl;
        ctx.drawImage(img, 0, 50, iwid, ihite); //khi dùng ảnh khác cần chỉnh lại ví trí

        compositeTexture.needsUpdate = true;

        material.map = compositeTexture; //gán texture mới cho material

        material.needsUpdate = true; //cập nhật material
      }

      rebuildTexture();

      let mesh = new THREE.Mesh(data.scene.children[0].geometry, material); //tạo vật thể từ geometry trong file GLTF và custom material được tạo ở trên

      scene.add(mesh);
    });

  })

  function animate() {
    requestAnimationFrame(animate);
    renderer.render(scene, camera);
  }

  animate();
</script>
</body>
</html>
Hãy chạy thử để có thể xem kết quả chân thực nhất nhé. Đoạn code trên sử dụng three.js vẽ 1 chiếc cốc in hình do người dùng tự thiết kế, chúng ta có thể xoay chiếc cốc 360 độ và có thể thay các hình thiết kế khác, tuy nhiên khi thay hình thì sẽ cần chỉnh sửa 1 chút ở phần tính toán đặt hình. Cảm ơn mọi người đã dành thời gian để đọc bài blog này. Chúc mọi người có những phút giây “vọc” three.js vui vẻ.

Quẳng Python, Javascript, Java đi – đây mới là ngôn ngữ bạn nên học trong thời gian tới

Svelte – Sự lựa chọn thay thế cho React và Vue?